Convert ROS image to CVImages
Joy stick test
Writing code to get input from Joy stick
Adding laser scan to robot
A Hokuyo laser scan description
Laser Assembler listen to point received from Laser scan
move base and navigation
วันอังคารที่ 16 พฤศจิกายน พ.ศ. 2553
วันพฤหัสบดีที่ 30 กันยายน พ.ศ. 2553
NOte for ROS stuff : )
NodeHandle
http://www.ros.org/wiki/roscpp/Overview/NodeHandles
param searchParam
http://www.ros.org/wiki/roscpp_tutorials/Tutorials/Parameters
subscribe to Topic API
http://www.ros.org/doc/api/roscpp/html/classros_1_1NodeHandle.html#ac8600d1dda9123e4562072500e0784b7
Tf API in C++
http://www.ros.org/doc/api/tf/html/c++/namespacetf.html
Navigation for robot, local_costmap, global_costmap, map_server
http://www.ros.org/wiki/navigation/Tutorials/RobotSetup
Using Custom Maps in Simulation
http://www.ros.org/wiki/pr2_simulator/Tutorials/UsingCustomMapForSimulation
Messages and frame_id
http://www.ros.org/wiki/Messages
Robot controller using keyboard
http://www.ros.org/wiki/pr2_controllers/Tutorials/Using%20the%20robot%20base%20controllers%20to%20drive%20the%20robot
Move base
http://www.ros.org/wiki/move_base
Laser Scan
http://www.ros.org/wiki/laser_pipeline/Tutorials/IntroductionToWorkingWithLaserScannerData
How to put 3D models into Gazebo simulation
http://www.ros.org/wiki/ogre_tools/STL_To_Ogre_Mesh_Converter
Directory for texture list
/home/jednipat/ros/stacks/simulator_gazebo/gazebo/gazebo/share/gazebo/Media/materials/scripts
-Gazebo/White
-Gazebo/Grey
-Gazebo/Eyes
-Gazebo/FlatBlack
-Gazebo/Black
-Gazebo/Red
-Gazebo/Green
-Gazebo/RedEmissive
-Gazebo/GreenEmissive
-Gazebo/BlueLaser
-Gazebo/BlueEmissive
-Gazebo/JointAnchor
-Gazebo/Blue
-Gazebo/Skull
-Gazebo/ExclamationPoint
-Gazebo/QuestionMark
-Gazebo/SmileyHappy
-Gazebo/SmileySad
-Gazebo/SmileyDead
-Gazebo/SmileyPlain
-Gazebo/WoodFloor
-Gazebo/CeilingTiled
-Gazebo/PaintedWall
-Gazebo/PioneerBody
-Gazebo/Pioneer2Body
-Gazebo/Gold
-Gazebo/CloudySky
-Gazebo/RustySteel
-Gazebo/Chrome
-Gazebo/BumpyMetal
-Gazebo/GrayGrid
-Gazebo/Rocky
-Gazebo/GrassFloor
-Gazebo/Rockwall
-Gazebo/RustyBarrel
-Gazebo/WoodPallet
-Gazebo/Fish
-Gazebo/LightWood
-Gazebo/WoodTile
-Gazebo/Brick
-Gazebo/TransparentTest
-Gazebo/DepthMap
-Gazebo/PCBGreen
-Gazebo/Turret
-Gazebo/EpuckBody
-Gazebo/EpuckRing
-Gazebo/EpuckPlate
-Gazebo/EpuckLogo
-Gazebo/EpuckMagenta
-Gazebo/EpuckGold
วันพุธที่ 28 กรกฎาคม พ.ศ. 2553
ROS Publisher and Subscriber
ROS publisher & subscriber
I just note for the important line of code from the ROS wiki.
The code below is used to define publisher in ROS system.
Publisher
ros::NodeHandle n;
ros::Publisher chatter_pub = n.advertise<std_msgs::String>("chatter", 100);
chatter_put is Publisher object.
n.advertise("topicname",numberofMessage);
To publish message, we can use the following code:
msg.data = datatobepublish; // assign message for publish
chatter_put.publish(msg); // Call publish method of Publisher class
Subscriber
A subscriber must define callback function that will get called when a new message have arrived on the chatter topic.
Define callback function:
void chatterCallback(const std_msgs::StringConstPtr& msg)
{
ROS_INFO("Received [%s]",msg->data.c_str());
}
Define nodeHandle and call subscribe function
ros::NodeHandle n;
ros::Subscriber chatter_sub = n.subscribe("chatter", 100, chatterCallback);
The line above means that
nodeObject.subscribe("publisherTopicName",numberOfMsgInQue,callbackFunctionName);
Reference: http://www.ros.org/wiki/ROS/Tutorials/WritingPublisherSubscriber%28c%2B%2B%29
I just note for the important line of code from the ROS wiki.
The code below is used to define publisher in ROS system.
Publisher
ros::NodeHandle n;
ros::Publisher chatter_pub = n.advertise<std_msgs::String>("chatter", 100);
chatter_put is Publisher object.
n.advertise
To publish message, we can use the following code:
msg.data = datatobepublish; // assign message for publish
chatter_put.publish(msg); // Call publish method of Publisher class
Subscriber
A subscriber must define callback function that will get called when a new message have arrived on the chatter topic.
Define callback function:
void chatterCallback(const std_msgs::StringConstPtr& msg)
{
ROS_INFO("Received [%s]",msg->data.c_str());
}
Define nodeHandle and call subscribe function
ros::NodeHandle n;
ros::Subscriber chatter_sub = n.subscribe("chatter", 100, chatterCallback);
The line above means that
nodeObject.subscribe("publisherTopicName",numberOfMsgInQue,callbackFunctionName);
Reference: http://www.ros.org/wiki/ROS/Tutorials/WritingPublisherSubscriber%28c%2B%2B%29
วันศุกร์ที่ 11 กันยายน พ.ศ. 2552
Install Subclipse ใน eclipse ganymede
1. ใช้ synaptic หรือ sudo apt-get install แพ็กเกจนี้--> libnb-svnclientadapter-java
2. เปิด eclipse ไปที่ Help->Software Updates->(Tab)Available Software->Add Site เติมชื่อเว็บไซต์ดังนี้ http://subclipse.tigris.org/update_1.6.x/
Note: ชื่อเว็บไซต์ตอน Add site จะแตกต่างกันขึ้นอยู่กับเวอร์ชั่นของ eclipse ที่ใช้ตรวจสอบดูว่าควรจะใช้ update site URL อะไรที่เว็บ subclipse
3. Add site เสร็จก็ คลิกเลือกเพื่อ install ดังนี้
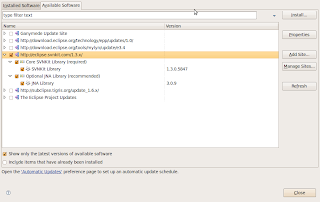 คลิกปุ่ม install
4. เมื่อการติดตั้งพร้อมก็คลิก Next , accept ละก็ Finish ได้เลย
วันเสาร์ที่ 5 กันยายน พ.ศ. 2552
Memo : Hack SURF code in openCV
Reference from example(find_obj.cpp) in openCV , there are steps as following:
1. Load source image and destination image with cvLoadImage(filename,CV_LOAD_
IMAGE_GRAYSCALE)
2. Data type cvSURFParams is used to do something? (Need more documentation)
3. Function cvExtractSURF is used to extract SURF feature points and descriptors for both source and destination images. By calling cvExtractSURF, it will give us info about key points(x and y location) in image and descriptor of each point. These info are kept in CvSeq data type where objectKeyPoints is used to keep location of key points and objectDescriptors is used to keep descriptor of each key point.
4. Function findPairs have iteration based on number of descriptor of sourc image. For each descriptor of source image is compared with every descriptor of destination image. Vector ptPairs is used to keep index of correspondence descriptors. ptPairs kept vector in pair of source descriptor index and destination descriptor index. (i.e. (1st src descriptor index, index of similar destination descriptor, 2nd src descriptor index, index of similar destination descriptor, 3rd src descriptor index, index of similar destination descriptor,......, nth src descriptor index, index of similar destination descriptor))
Precisely, even index of ptPairs will point to source objectKeyPoints and odd index of ptPairs will point to destination imageKeyPoints. Now , you will get point correspondences between two image.
วันศุกร์ที่ 4 กันยายน พ.ศ. 2552
Installation openCV on Ubuntu 9.04
วันนี้ทำการลง openCV ใหม่หลังจากลงอุบุนตุใหม่ ประกอบกับจำไม่ได้ว่า
ครั้งก่อนลงไปแล้วไม่ได้จดวิธีลงไว้ ลงอีกครั้งเลยขอจดไว้ก่อน เผื่อคราวหน้า
ลงอุบุนตุใหม่จะได้ไม่มานั่งงมอีก
อ้างอิงการลง openCV บน Ubuntu 9.04 จาก
http://webeng.cs.ait.ac.th/cvwiki/opencv:tutorial:install:ubuntu
(Thanks อ.แมท(Dr.Matthew@AIT)for very useful installation guide)
ซึ่งมีขั้นตอนดังนี้
1. ใช้ synaptic ติดตั้ง libgstreamer0.10-dev และ libdc1394-13-dev
2. ดาวน์โหลด opencv 1.1.0 ได้จาก openCV wiki
3. แตกไฟล์ opencv-1.1pre1.tar.gz โดยใช้คำสั่ง tar -xvfz opencv-1.1pre1.tar.gz
4. ในไดเรกทอรี่ของ opencv-1.1.0 พิมพ์คำสั่ง(ให้เหมือนอันนี้เลยนะ เครื่องหมาย=พิมพ์ให้ติดprefix)
./configure --prefix=${HOME}/opencv --without-xine --without-quicktime --with-gstreamer --with-1394libs --with-v4l
5. ในไดเรกทอรี่ของ opencv-1.1.0 พิมพ์คำสั่ง
make
6. เมื่อ make เสร็จ ก็พิมพ์
make install
เพื่อติดตั้ง opencv ได้เลยโดย opencv จะไปติดตั้งอยู่ที่ /home/jednipat/opencv ตามไดเรคทอรี่ที่ระบุไว้ตอนรัน ./configure
7. พิมพ์
export LD_LIBRARY_PATH=/home/jednipat/opencv/lib
เมื่อ make install เสร็จ ก็ลองมารัน example ที่ opnecv ให้มาโดยคอมไพล์ดังนี้
g++ -o outputname yourfilename.c -I /home/jednipat/opencv/include/opencv/ -lhighgui -L /home/jednipat/opencv/lib/
กรณีของผมคอมไพล์ผ่านแต่พอรันแล้ว เจอ error ดังนี้ (เนื่องจากผมลืมทำข้อ 7)
error while loading shared libraries: libhighgui.so.2: cannot open
shared object file: No such file or directory
เลยค้นวิธีแก้ได้มาจากบล็อกของ dsin (พี่พง) สาเหตุเป็นเพราะว่ายังไม่ได้ export LD_LIBRARY_PATH ซึ่งก็ทำได้ดังนี้
export LD_LIBRARY_PATH=/home/jednipat/opencv/lib

ที่นี้คิดว่าน่าจะรันได้ตามปกติ ลองคอมไพล์และรัน example ดูอีกที คอมไพล์ผ่าน
แต่พอรันปุ๊ป เจอกับ

OpenCV ERROR: Unspecified error (The function is not implemented.
Rebuild the library with Windows, GTK+ 2.x or Carbon support)
in function cvNamedWindow, window.cpp(71)
Terminating the application...
Segmentation fault

อ๊ากก... ค้นไปค้นมาอีกก็ได้คำแนะนำจากเว็บนี้  < - - คลิก  คอมเมนต์สุดท้ายบอกไว้ว่าสาเหตุมาจากตอนรัน ./configure และ make ไม่มี gtk+ lib dev ไม่มีเขาแนะนำให้ remove openCV ออกก่อน แล้วไปลง libgtk2.0-dev (เข้า synaptic package management แล้ว search คำว่า libgtk2.0-dev ละก็ mark for installation - > apply )

เมื่อลง libgtk2.0-dev เสร็จให้ uninstall openCV  ก่อนโดยพิมพ์ make uninstall
ในไดเรคทอรี่ opencv-1.1.0 จากนั้นเพื่อความชัวร์ควรจะ restart เครื่องก่อน
(ผมไม่รีสตาร์ทเครื่อง  make ใหม่ก็เจอปัญหาเดิม เลยลอง รีสตาร์ทเครื่อง แล้วทำใหม่)

แล้วทำการ ./configure , make , make install อีกที

1>  ./configure blablabla..
2>  make
3>  make install
4>  export LD_LIBRARY_PATH=/home/jednipat/opencv/lib

จากนั้นไปยัง directory  /home/jednipat/opencv-1.1.0/samples/c
แล้วลองคอมไพล์ไฟล์ใด ๆ ผมเลือกไฟล์ตัวอย่างการใช้งาน SURF descriptor
ชื่อไฟล์ว่า find_obj.cpp คอมไพล์ด้วยคำสั่งดังนี้

g++ find_obj.cpp -o test -I /home/jednipat/opencv/include/opencv/ -lhighgui
-L /home/jednipat/opencv/lib/

จากนั้นรัน ./test เพื่อดูผลลัพธ์ของโปรแกรม

เย้... สำเร็จ..
วันอาทิตย์ที่ 5 กรกฎาคม พ.ศ. 2552
How to computing camera matrix P
1. ทำการแรนดอมดาต้าของจุดใน 3D มาก่อน โดยทำการแรนดอมโดยฟิกค่าเฉลี่ยของระยะบนแกน Z อยู่ที่ 5 แล้วทำการแรนดอมค่าให้ได้เมตริกซ์ขนาด 4x30 โดยแต่ละคอลัมน์ของเมตริกซ์แสดงถึงค่าของ [ x ; y ; z+5; 1] ซึ่งผลลัพธ์ของขั้นตอนแรกนี้จะได้เมตริกซ์ลักษณะนี้ Xw= [x1,x2,....,x30 ; y1,y2,....,y30; z1+5,z2+5,...,z30+5;1,1,......,1]4x30 (Xw เป็นชื่อเมตริกซ์นะ)
2.จากนั้นทำการกำหนดค่า intrinsic camera parameter ลงในเมตริกซ์ขนาด 3x3 ดังนี้ K = [ 320 0 320 ; 0 320 240 ; 0 0 1 ]3x3 ในกรณีนี้ principal point ถูกเซ็ตค่าอยู่ที่ px=320(K(1,3)) py=240(K(2,3))
3.หลังจากกำหนดค่า intrinsic camera parameter แล้วก็ต้องกำหนด extrinsic camera parameter ด้วย กรณีนี้ให้ Rotation matrix มีค่าดังนี้ [1 0 0 ; 0 1 0 ; 0 0 1]3x3 และยังไม่มีการ translate จึงได้เมตริกซ์ t = [ 0 ; 0 ; 0 ] เมื่อได้ทั้ง extrin และ intrin แล้วจะได้เมตริกซ์ของกล้อง P ดังนี้ P = K*[ R t ] ซึ่งได้ผลลัพธ์ดังนี้ P= [320 0 320 0; 0 320 240 0; 0 0 1 0]3x4 เมตริกซ์ P นี้จะเป็นเมตริกซ์ที่ใช้ในการฉายภาพจากวัตถุใน 3D ลงมายังฉาก 2D (กล่าวคือ เปลี่ยนพิกัด 3D เป็น 2D บนภาพนั่นเอง)
4. เมื่อได้ P แล้วก็นำจุดที่แรนดอม Xw มาโปรเจคลงบนฉากโดยเราจะเรียกว่าเป็นการโปรเจคแบบอุดมคติ (ideal projection) โดยแต่ละจุดบนฉากจะแทนด้วยเมตริกซ์ x โดยที่ x = P*Xw ซึ่งมีขนาด 3x30 ซึ่งแต่ละคอลัมน์ของเมตริกซ์นี้จะเป็นจุดที่มีค่าทั้งแกน x , y และ z จากหลักการของ homogeneous matrix การแปลงจุดจาก 3D (x,y,z) สามารถแปลงไปเป็นจุดบนฉากได้โดยการนำ z ไปหาร x และ y ซึ่งจะได้พิกัดบนฉาก 2D เราจึงได้จุด (x/z,y/z) มาถึงตอนนี้เราจะได้พิกัดบนฉาก 2D ละ โดยเราเก็บจุดทั้ง 30 จุดไว้ในเมตริกซ์ x เหมือนเดิม เพื่อง่ายต่อการเข้าใจเราใช้คำสั่งนี้เพื่อให้ได้เมตริกซ์ของจุด 30 จุดบนฉาก2D x=x./repmat(x(3,:), 3 , 1 ) (ผลลัพธ์จะได้พิกัดจุดบนฉาก 30 จุด ซึ่งแถวที่สามในทุกคอลัมน์ของเมตริกซ์จะเป็น 1 หมด)
5.จากนั้นเราจะทำการเพิ่ม gaussian noise และทำเมตริกซ์ให้เป็น discrete มากขึ้นโดยการแรนดอมค่าระหว่าง 0 ถึง 1 แล้วบวกเข้ากับแถว 1 และ 2 ในเมตริกซ์ x จากนั้นก็ round (ปัดทศนิยมทิ้ง) แล้วเก็บไว้ในเมตริกซ์ x อันเดิม
6.หาค่าเฉลี่ยระยะห่างของจุดทั้ง 30 จุดใน 3D (ใช้ค่าในเมตริกซ์ Xw) กับตำแหน่งของกล้อง(ในที่นี้ตำแหน่งกล้องอยู่ที่ 0,0,0) โดยใช้ avg_dist_to_cam = mean( sqrt( sum(( Xw(1:3,:) - repmat( C, 1, n )).^2))); คำสั่งนี้จะทำการหาค่าระยะห่างระหว่างตำแหน่งกล้องและจุด 3D 30 จุด โดยในแต่ละคอลัมน์จะคำนวณดังนี้ ระยะห่างจากกล้องถึงจุด3D = sqrt((x-0)^2 + (y-0)^2 + (z-0)^2) (สาเหตุที่ x, y ,z ลบด้วย 0 เพราะว่า camera อยู่ที่ 0,0,0) ณ ขั้นตอนนี้เมตริกซ์ 3x30 เราจะถูกยุบเหลือ 1x30 แล้วเนื่องจากคำสั่ง sum จะทำการบวกแถวในแต่ละคอลัมน์นั่นเอง เมื่อ sum และ sqrt แล้วสิ่งที่เราได้ตอนนี้คือค่าระยะห่างจากกล้องถึงจุดทั้ง 30 จุดซึ่งเป็นเมตริกซ์ 1x30 นั่นเอง จากนั้นเราใช้คำสั่ง mean เพื่อหาค่าเฉลี่ยระยะห่างจากกล้องถึงจุดทั้ง 30 จุด แล้วเก็บไว้ในตัวแปร avg_dist_to_cam
7.ทำการนอร์มอลไลซ์ homogeneous coordinate
Xw = Xw ./ repmat( Xw(4,:), 4, 1 ); <--- จุดใน 3D
x = x ./ repmat( x(3,:), 3, 1 ); <-- จุดบนฉาก 2D
8.หา isotropic scaling เพื่อ normalize x กับ Xw (isotropic scaling คือ sx = sy = sz)
สำหรับ 3D จะหาเมตริกซ์ transform เพื่อจะนำจุดcentroid(ของจุดทั้ง 30 จุด)กลับมายัง origin โดยจะคำนวณ centroid ของจุดใน 3D โดยใช้ค่าเฉลี่ยของแต่ละแกน (x1+x2+...+x30)/30 แกน y ก็หาโดย (y1+y2+...+y30)/30 แกนz ก็หาโดย (z1+z2+...+z30)/30 ก็จะได้ centroid ของ จุด 30 จุด แต่เราจะต้องใส่เครื่องหมายลบให้ค่าของ centroid เนื่องจาก เป็นการนำ centroid กลับมายัง origin โดยใช้คำสั่งใน octave ดังนี้ Ttrans = [ eye( k ), -mean( Xw(1:k,:)' )' ; zeros( 1, k ), 1 ]; Ttrans คือเมตริกซ์ขนาด 4x4 ที่มีลักษณะดังนี้ [ 1, 0 , 0 , ค่าที่ใช้ย้ายในแกนx ; 0 , 1 , 0 , ค่าที่ใช้ย้ายในแกนy ; 0 , 0 , 1 , ค่าที่ใช้ย้ายในแกนz ; 0 , 0 , 0 ,1 ]4x4 (หากใครเคยเรียนCG มาคงคุ้น ๆ กับเมตริกซ์นี้ ซึ่งมันก็คือเมตริกซ์ที่เราใช้ในการ translate นั่นเอง)
มาถึงตอนนี้แล้วเราได้เมตริกซ์ที่ translate centroid มายัง 0,0,0 แล้ว ก็ใช้ให้มันเป็นประโยชน์ โดยการนำเมตริกซ์นี้มาใช้หาตำแหน่งของจุดทั้ง 30 จุดโดยอ้างอิงจากจุด 0,0,0 (แต่เดิมจุด30จุดมันไม่ได้อ้างอิงจากจุด 0,0,0 การจะ rotate , scale ก็ทำยากมากมาย) traslated_Xw = Ttrans*Xw ; (คูณเมตริกซ์เหมือน CG เลย เอา translate เมตริกซ์ไว้ข้างหน้าจุดไว้ด้านหลัง ไม่ใช่ Xw*Ttrans นะ)
เมื่อได้ translated_Xw แล้ว เราต้องหา scaling factor ที่เหมาะสมให้กับจุดทั้ง30จุดใน translated_Xw โดยหาระยะห่างจากจุดทั้ง 30 จุดกับ origin แล้วหาค่าเฉลี่ยรวมของระยะห่างทั้ง 30 จุด ดังนี้ s=sqrt(k)/mean(sqrt(sum(translatedXw(1:k,:).^2))) โดย k = size(Xw,1)-1 เมื่อได้ s แล้วเราก็จะสามารถสร้าง Tscale เมตริกซ์ซึ่งใช้สำหรับการสเกลได้ (ซึ่งเมตริกซ์นี้จะทำการ scale ทั้งแกน x,y,z เท่ากันเพราะใช้ s ตัวเดียวกัน หรือเรียกอีกอย่างว่าเป็น isotropic scale ไงล่ะ) ใช้คำสั่ง octave ได้ดังนี้ Tscale = [ s * eye(k), zeros(k,1) ; zeros(1,k), 1 ]; ซึ่ง Tscale จะมีลักษณะดังนี้ [ s , 0 , 0 ,0 ; 0 , s ,0 ,0 ; 0 , 0 , s , 0 ; 0 , 0 , 0 , 1 ]4x4 (เหมือนเช่นเคยมันคือเมตริกซ์ scaling ใน CG อีกนั่นเอง)
มาถึงตอนนี้เราได้เมตริกซ์ Trans(late) และ Tscale แล้ว จัดการรวมร่างมันซะ ให้ได้ Transform matrix ทำได้ดังนี้ T_for_Xw = Tscale*Trans;
ขั้นตอนที่กล่าวมานี้อธิบายสำหรับเมตริกซ์ Xw (จุดใน 3D) ซึ่งยังไม่จบ เราต้องหา Transform matrix สำหรับ 2D ด้วย ซึ่งก็ทำเหมือนกันเพียงแต่ค่า k จะเปลี่ยนเป็น k=size(x,1)-1
Ttrans = [ eye( k ), -mean( x(1:k,:)' )' ; zeros( 1, k ), 1 ];
translated_x = Ttrans*x;
s=sqrt(k)/mean(sqrt(sum(translated_x(1:k,:).^2)));
Tscale = [ s * eye(k), zeros(k,1) ; zeros(1,k), 1 ];
T_for_x=Tscale*Ttrans;
9. เมื่อได้ transform matrix มาแล้วเราก็ทำการ transform ทั้งจุดใน 3D(Xw) และก็จุดในฉาก(x) กันเลย โดยใช้คำสั่งดังนี้
xtilde = T_for_x*x;
Xwtilde = T_for_Xw*Xw;
10. เมื่อได้จุดที่ถูก transform แล้วเราจะมาประมาณค่าแบบเชิงเส้นของเมตริกซ์ P (เมตริกซ์ของกล้อง) โดยใช้ DLT algorithm เพื่อประมาณค่า P (DLT algorithm ไว้จะมาอธิบายวันหลัง) แต่มีโค้ดดังนี้
%------------------------------------------------------------------------
function P = dlt( xtilde, Xwtilde )
n = size( Xwtilde, 2 );
if n < 6
error( 'DLT for P requires at least 6 points' );
end;
A = [];
for i = 1:n
xi = xtilde( 1, i );
yi = xtilde( 2, i );
wi = xtilde( 3, i );
Xwi = Xwtilde( :, i );
Ai = [ 0, 0, 0, 0, -wi * Xwi', yi * Xwi' ;
wi * Xwi', 0, 0, 0, 0, -xi * Xwi' ];
A = [ A ; Ai ];
end;
[U,D,V] = svd( A );
% The solution P minimizing |Ap| subject to |p|=1 is the last column of V
P = reshape( V(:,12), 4, 3 )';
P = P / norm(P(3,1:3));
%------------------------------------------------------------------------
สมัครสมาชิก:
บทความ (Atom)